How to Get Rid of Clover in Lawn
While it isn’t necessarily a harmful species, clover is a fast-spreading invasive weed that can spoil the aesthetics of a lawn and may outgrow grass under the right conditions. As it is able to produce its own nitrogen, clover will often take over in an under-nourished lawn that is particularly deprived of this essential nutrient.
There are a number of methods, both chemical and organic, that you can use to get rid of clover in a lawn. Methods include manual removal by hand, fertilizing the lawn with a high-nitrogen fertilizer, mowing the lawn higher, or spraying a chemical herbicide using a spreader.
This article provides step-by-step guides on how to get rid of clover, what causes it, and how to prevent it from spreading in your lawn in the first place. Additionally, this article also explains some of the benefits of having it in your lawn and why it may be a better idea to let the clover grow unless the removal is essential for the health of your grass.
What is Clover?
Clover is a common perennial weed found throughout the United States. It is a member of the legume family, also sharing a close relation to the agricultural crops of sweet clover and alfalfa. Like all plants in the legume family, clover has the capability of creating its own fertilizer by absorbing nitrogen from the air and converting it into a plant-usable form. It spreads quickly both by seed and by growing creeping stems which root along the ground, and is more resilient and drought tolerant than other broadleaf weeds.
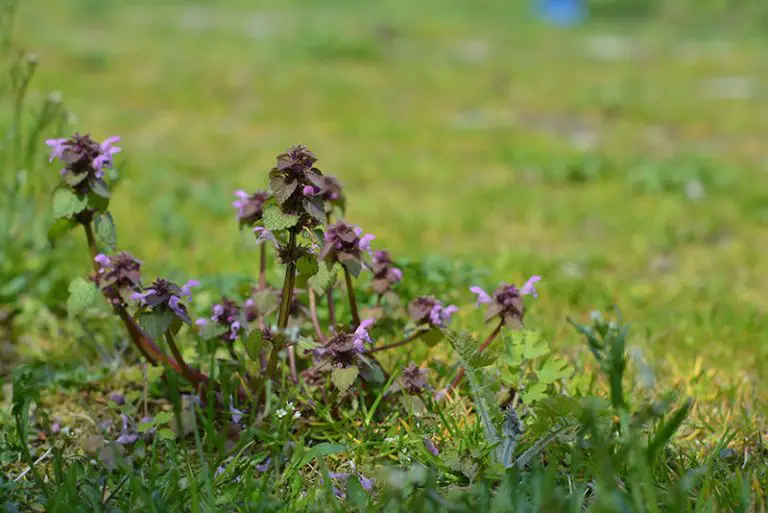
What Does Clover Look Like?
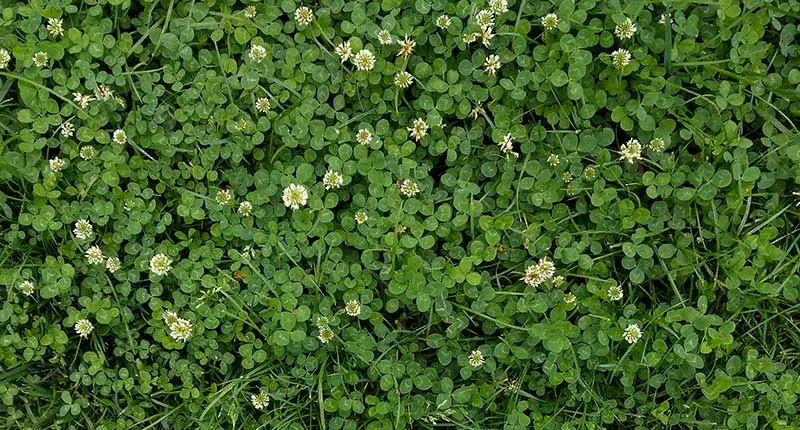
There are a few different types of clover, but the most prevalent species is white clover or ‘Trifolium repens’. White clover has three ½-inch petal-shaped leaves on each stem, and the three stems will grow to reach a maximum height of 6 inches. It has white flowers that will start to bloom in the early spring, before dying off in the late fall until they return the next year. The flowers can sometimes have a very faint pink tint. White clover has a very shallow root system and doesn’t tolerate drought well.
Is Clover a Weed?
While it isn’t harmful to your lawn, clover is generally considered to be a weed. It has earned this status due to the fact that it’s typically an unwanted wild plant that will grow in competition with intentionally cultivated plants, these most often being the grass plants in a lawn. Some people do grow clover intentionally, whether it be for aesthetic reasons or if the soil is too poor to grow grass. However, for the most part, it will grow in lawns where it isn’t desired, and therefore it’s considered by most to be a weed.
Is Clover Good for Your Lawn?
Clover Acts As a Natural Nitrogen-Rich Fertilizer
Clover can act as an all-natural fertilizer to remedy lawns with nitrogen-deficient soil. Nitrogen is one of the primary nutrients needed by grass to grow, being responsible for ensuring the grass grows thick, green blades high above the soil level. Clover plants take in nitrogen from the air, where it travels down to the plants’ root nodules. The plants have what’s known as a symbiotic relationship with beneficial bacteria in the soil, so-called because these bacteria attach themselves to the clover plants’ roots. Once the nitrogen has reached the clover’s roots, the clover works with the bacteria to convert it into a form of nitrogen usable by other plants, thus enriching the soil.
On top of this, having a good balance of clover to grass means you probably won’t have to add any other fertilizer to your lawn to keep it looking green throughout the year. When your grass goes through periods of stress, perhaps turning yellow or brown in the hot summer months, the green clover will keep your lawn looking lush and healthy until the grass has recovered.
Clover Helps to Prevent Weeds
It’s recommended to mow your lawn high to act as a natural defense against weeds, as the taller grass casts more shade on the soil’s surface, making it harder for weeds to establish themselves. Following this same logic, clover helps to prevent weeds from overtaking a lawn, even more so than long grass blades do. The leaves of the clover act similarly to umbrellas, shading the soil’s surface better than the grass blades would do on their own, creating an even less inhabitable environment for any potential weeds.
For this reason, letting the clover grow is a great option for those who prefer to mow their lawn short but also want the benefit of reduced weed growth. With a layer of clover, you can mow your lawn to a regular height (i.e. ~2.5 inches) without needing to worry about the soil being exposed and prone to weeds.
Microclover Provides the Benefits of Clover Without the Drawbacks
You have the option of planting microclover if you would like to have all the benefits of clover without the drawbacks. Microclover will flower much less prolifically than white clover, but is still potent enough to spread evenly throughout a lawn. Lawns grown with microclover tend to be healthier, greener, and have less weed growth than those with no clover at all.
What Causes Clover to Grow in Lawn?
Wrong Soil pH
The pH of your soil, i.e. whether it’s acid or alkaline, will have an effect on how much clover grows in your lawn. Most varieties of clover are able to grow in soils of nearly any pH, while grass ideally needs a soil pH of 6.0 to 7.0 depending on the species. If the soil in your lawn doesn’t fall within this range, the grass will have a harder time growing, leaving lots of room for clover to take over. To find out whether this is the case, you can either test the pH of your soil yourself using a home testing kit like this cheap and easy-to-use Luster Leaf Rapitest Soil Test Kit. Alternatively, you could send a sample to be tested by a professional laboratory to get a more detailed analysis. Once you have determined your pH, you can then add the appropriate pH adjusting materials to get it into the ideal range for growing grass.
Poor Nutrient Levels in Soil
In order to outgrow other weeds and plants, grass needs to be in soil that’s rich in nutrients – particularly nitrogen. As we’ve discussed, nitrogen is one of the most important nutrients needed by grass to grow. If the soil in your lawn becomes nitrogen deficient, the grass will struggle to grow, resulting in thinning or dead patches. However, since clover is capable of producing its own nitrogen, it will continue to grow and will eventually outgrow the grass in the lawn.
Underwatering of Lawn
If you fall behind on your watering schedule, this can lead to your grass becoming stressed and creates more room for clover and other weeds to grow.
Compacted Soil
Grass will struggle to grow in compacted soil, due to the lack of spaces needed for water and air to reach the grass plants’ roots. Clover on the other hand is well-equipped to grow in compacted soil, as it has longer roots which provide it with better access to water compared to grass plants.
Grass Mowed Too Short
Mowing your grass too short can encourage the presence of clover. By removing the long blades, you expose more of the soil’s surface to the sun, which in turn encourages the growth of clover and other weeds on your lawn.
How to Get Rid of Clover in Lawn Organically
Pull Clover Out By Hand
For small patches, you can attempt to get rid of clover by pulling it up manually.
Method: Using a spade, trowel, or your hand, loosen the soil around the clover and then pull the clover out, removing the entire plant and roots. Make sure not to leave any roots behind, otherwise the clover will just grow back.
Deprive Clover of Oxygen and Sunlight
You can kill clover on a lawn by depriving the plants of oxygen and sunlight, which prevents them from being able to grow. This method is effective to get rid of clover in larger patches, and will also help to get rid of other types of weeds on your lawn, such as crabgrass or chickweed.
Method: Place some plastic sheeting or a garbage bag over the patches of clover, and secure each corner of the material with something heavy like a rock to prevent it from being blown out of place. After a few weeks, the clover will have died off, along with any grass that was also underneath the plastic. You may need to reseed your lawn after this method if there are patches of dead grass that need to be repaired.
Spray Clover With Vinegar Solution
You can DIY your own non-toxic solution to kill clover out of vinegar, water, and dish soap. The vinegar dries out the leaves of the clover, while the soap helps the process by making the vinegar stick to the plant. Take note that this method may damage the surrounding grass after repeated applications.
Method: Take 1 cup vinegar, 1 cup water, and 1 drop of dish soap, and pour the ingredients into a spray bottle. Shake the bottle to mix the solution, then spray it over the patches of clover that you want to remove. You may need to repeat this process for several weeks before the clover completely dries out.
Treat Clover With Herbicide
There are herbicides on the market that have been specially formulated to kill clover and other weeds without harming or killing the surrounding grass. Spraying a selective weed killer on the problem patches in your lawn will get rid of the clover without weakening the grass, giving the grass a better chance of outcompeting the clover in growth. We recommend using the Ortho WeedClear Weed Killer, as it promises to get rid of clover along with a number of other weeds, all without harming the surrounding grass.
Fertilize Lawn With Nitrogen
Applying an inorganic or organic fertilizer is an excellent way to keep any kind of weed at bay, but applying a fertilizer rich in nitrogen is particularly effective when it comes to getting rid of clover. It is the lack of nitrogen in soil that encourages clover to spread and outgrow grass. Making sure your lawn is well fertilized with a nitrogen-rich fertilizer will reduce clover growth at the same time as improving the growth of the grass. Our favorite high-nitrogen fertilizer is the Maximum Green & Growth Lawn Food – it has been designed to act as both a quick-release and slow-release fertilizer, meaning it will provide a boost of initial nitrogen followed by a gradual release of the nutrient to stave off clover growth.
Method: For small amounts of clover, use a slow-release organic fertilizer. If your lawn is becoming overgrown with clover, use a nitrogen-rich synthetic fertilizer that will get to work more quickly. Apply your chosen fertilizer in the spring and fall in order to give the growing advantage to the grass on your lawn and get rid of the clover.
Mow the Lawn Higher
Mowing the lawn higher will help to reduce the growth of clover in your lawn. Some assume that mowing the lawn shorter will get rid of the clover, but doing so is more likely to have the opposite effect. Clover grows very close to the ground and has a shallow root system, so it will survive against a mower on a low height setting. Removing so much of the grass blade leaves the soil’s surface more exposed to the sun, which encourages the growth of the clover rather than reducing it. On top of this, grass mown to any height below 3 inches will become stressed, giving even more of an advantage to the clover to grow. By mowing your grass higher, the taller blades have a better ability to block out the light reaching the clover which should end up causing it to die.
Improving the aesthetics of your lawn and looking to get rid of moss too? Read through our article How to Get Rid of Moss in Your Lawn to find out how.
How to Kill Clover in Lawn With Herbicide
Follow this method to safely and effectively kill clover in your lawn using a chemical herbicide.
1. Pick the Right Herbicide
Many types of herbicides can be used effectively to kill clover, but without the right product, this weed’s aggressive growth habit means that it will likely recover and regrow quickly. The type of herbicide you should use depends on what type of grass you have:
For cool-season grasses, the best type of herbicide to kill clover is triclopyr. Triclopyr can either be purchased on its own or as part of a blend of other herbicides. While the blended products are capable of tackling more weeds, it isn’t recommended to use them on lawns with exposed roots. Most herbicide blends contain an ingredient called Dicamba that can cause severe damage to trees if taken up by their roots.
For warm-season grasses, you should never apply triclopyr as you would on cool-season grasses, as this type of herbicide is not suitable. Instead, use a herbicide that has been specially formulated for southern or warm-season grasses.
There are some granular herbicides on the market, which are usually sold in combination with fertilizer as a ‘weed and feed’ product. However, these products are notoriously unreliable at providing effective weed control in the same way that a liquid herbicide does.
2. Pick the Right Spreader
Chemical herbicides require a sprayer for the safe and even application of the product. Sprayers come in a variety of shapes and sizes:
For small lawns, use a small, hand-carried pump sprayer like this Vivosun Handheld Garden Sprayer Pump.
For medium lawns, use a backpack sprayer like this Field King Backpack Sprayer.
For large lawns, use a push sprayer or tractor-pulled sprayer like this Streamline Industrial Cart Mounted Sprayer.
Regardless of the sprayer that you choose, the most important aspect when trying to kill clover is making sure that the device is equipped with a high-quality fan-tip nozzle.
3. Ensure Optimal Conditions for Herbicide Application
Weeds need to be in a stage of active growth in order to be susceptible to the effects of herbicide. For clover, this means that the herbicide should be applied when there is a daytime temperature of at least 60 degrees Fahrenheit. Attempting to apply the herbicide when the temperature is any cooler than this will garner little to no results, and if the temperature is hotter than this, the herbicide is likely to damage the surrounding grass in addition to killing the weeds.
It’s also important that the herbicide is applied onto a dry lawn, as dew, rain, and irrigation water will dilute the product and prevent it from sticking to the clover. Lastly, you should mow the grass before applying the product.
It’s usually advised not to mow the lawn before applying a weed killer, as in doing so you’re reducing the size of the weed, thus reducing the size of the target for the product. However, it is recommended to do so when trying to get rid of clover, otherwise the tall grass may block the product from reaching the low-growing weed. With that said, you should avoid mowing for at least 24 hours after the application to give it time to work its way down to the clover.
4. Mix Herbicide
Read the instructions on the label of your chosen herbicide. Add half the water that the label calls for into the sprayer, then add in the specified amount of the herbicide. Mix the solution well, either with the use of a manual or drill-attached paint mixer, or by shaking the sprayer firmly for several minutes. Add a surfactant at this stage if your chosen herbicide would benefit from one. Lastly, mix in a marking dye along with the second half of the water as called for on the label. The marking dye helps you to see where you have sprayed the herbicide as you’re working to prevent over-application and potentially damaging the surrounding grass. Take note that the herbicide to water ratio may vary depending on whether you’re broadcast spraying or spot spraying (as explained in the next step), so refer to the label to know the correct amounts for your method of application.
5. Spray Herbicide on Clover
There are two methods of herbicide application; broadcast spraying, which is when the lawn is sprayed in its entirety, or spot spraying, which is when the herbicide is applied to specific targeted areas and patches of weeds.
Spot spraying is the more responsible choice of herbicide application for most lawns. For best results, spray the clover until it is damp but not so much that it’s sodden and dripping. Take care not to over-apply the herbicide as this can damage the surrounding grass.
Broadcast spraying should only be carried out on extremely large areas where spot spraying would be too impractical, or on lawns that have a severe and extensive infestation of clover. Spray the herbicide mixture evenly over the entirety of the lawn. As a tip for beginners, try practicing with water a few times first to get the hang of the technique.
You should see the clover begin to wilt and turn yellow the day after application, and the complete death of the clover to its roots should happen about one to two weeks later.
How to Prevent Clover in Lawn
Spread Organic Fertilizer
Clover thrives in soil that lacks essential nutrients needed by most plants to grow. While the grass in your lawn becomes stressed and dies off in soil that lacks nitrogen and other key nutrients, clover will begin to grow voraciously, even more so than it would in healthy soil. Keep up with a regular fertilization schedule using a high-quality organic fertilizer in order to boost the health of your grass at the same time as staving off clover growth.
Apply Pre-Emergent Herbicide
Pre-emergent herbicides are weed killers formulated to get rid of weeds that haven’t yet emerged from the soil. You can apply a pre-emergent herbicide to the areas of the soil where the clover is likely to grow. The treatment should remain effective at preventing the growth of clover for around three to four months. We recommend using the Scotts WeedEx Pre-Emergent Weed Control and applying it in the early spring to prevent clover growth all season long.
Spread Corn Meal Gluten
Cornmeal gluten will not kill existing weeds, however, it does have the ability to prevent the growth of new weeds by drying out the new weed seedlings’ roots before it has the chance to grow. Cornmeal gluten has the additional benefit that it’s also a source of nitrogen, further enhancing its ability to prevent weed growth. Take note that for this method, the timing of the application is crucial. If the conditions of the soil are too wet when you apply the corn gluten, the treatment won’t have any effect. When applied in the right conditions, the treatment should remain effective for five to six weeks, after which it will need to be reapplied to continue doing its job. Try using the Indian Head Yellow Corn Meal for an organic alternative to pre-emergent weed killer.
Raise Mowing Height
Avoid stressing out your grass and encouraging clover to grow by raising your usual mowing height. Letting your grass grow longer means that it will be healthier and more resilient to stress, preventing the clover from having the space to outgrow it. The longer blades also provide the necessary shade to discourage weeds on the surface of the soil from growing.
Water Properly
Maintaining the ideal amount of moisture in your lawn can significantly aid in controlling clover growth. When the soil is too wet, it provides the perfect habitat for weed seeds to germinate, and when it’s too dry, it becomes weak and susceptible to weed growth. The exact amount of watering you need to do will depend on your soil, grass species, and the time of year. As a general rule, it’s recommended to water the soil based on when it dries out, rather than on a fixed temporal schedule. See our article for full guidance on the best watering practices.
Overseed Lawn
Overseeding a weedy lawn helps it to become more resilient against invasive weed growth, including clover. Overseeding will also be necessary if you have just managed to get rid of clover in your lawn but it has left you with patches of bare soil, or dead or yellowed grass. This process involves applying grass seed to the affected areas, then covering it with a thin layer of mulch and watering it regularly until the new grass grows in.
Aerate Lawn
Aerating your lawn as part of your annual gardening schedule will help to improve the health of your grass while also reducing clover growth. Grass will become stressed in soil that is compacted as it prevents air and water from reaching the plants’ roots, whereas clover plants are equipped with longer roots necessary to survive in these conditions. By aerating your lawn, you create the spaces necessary for water and air to flow down into the soil where it’s taken up by the grass’ roots, resulting in stronger, healthier grass plants, and a reduction in clover growth. You can also add your pre-emergent herbicide after aerating your lawn for more effective clover control.