Eliminate Henbit Weeds Easily with the Best Weed Killer
Despite being an edible plant with medicinal properties, henbit is considered an invasive weed common to lawns across the US.
To kill henbit weeds, you can either hand-pull the henbit or treat it with a suitable post-emergent weed killer. Following its removal, you can prevent reinfestation of this weed by mulching the soil, using corn-gluten meal, or treating the soil with pre-emergent herbicide.
What is Henbit?
Lamium amplexicaule, or Henbit, is a common lawn and garden weed in the mint family. Henbit most often grows as a winter annual or biennial, but may also grow as an aggressive, spring-germinating annual.
Henbit grows all over the US and throughout many other parts of the world. In Europe and Asia, henbit leaves are eaten raw or cooked, as they are completely non-toxic and edible. However, henbit is more commonly regarded as a weed to those in the US. In addition to lawns and gardens, this weed grows along roadsides and railroads, in pastures and cultivated fields, and on open areas of waste ground.
Identifying Henbit Weeds on Lawn
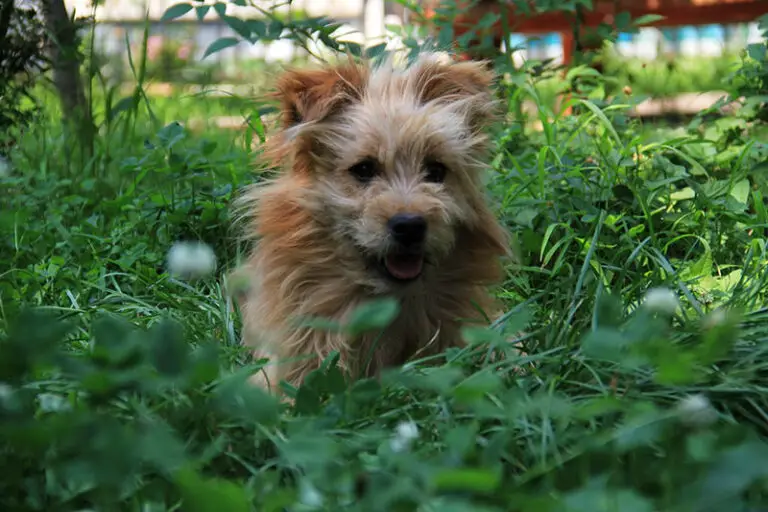
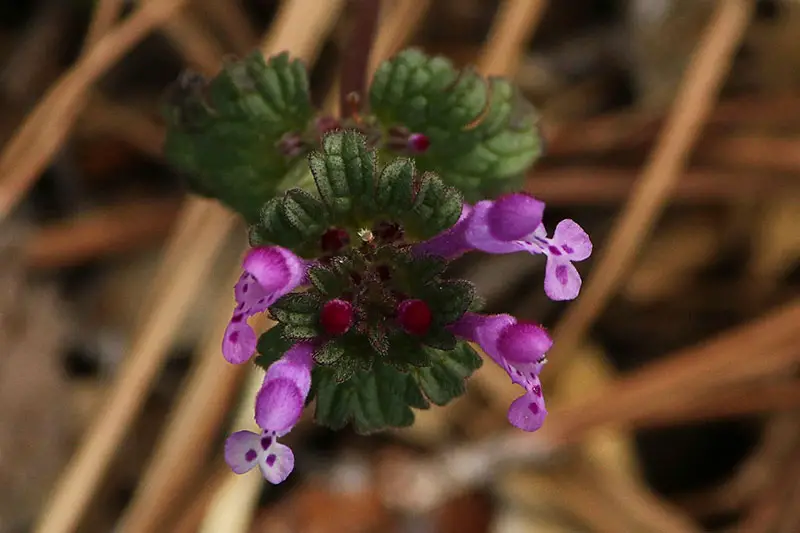
Henbit weeds are sparsely-haired and have purple-green square stems that can grow to a height of 16 inches tall. They have oppositely-arranged leaves on either side of the stems; the leaves are green, oval shaped, and scalloped at the edges, having prominent veins on their undersides.
The root systems of henbit weeds are dense and fibrous. Another defining feature of henbit is that it will produce small reddish-purple flowers in the spring; this makes henbit one of the many weeds with purple flowers you may find in your yard.
Henbit Weed vs Deadnettle
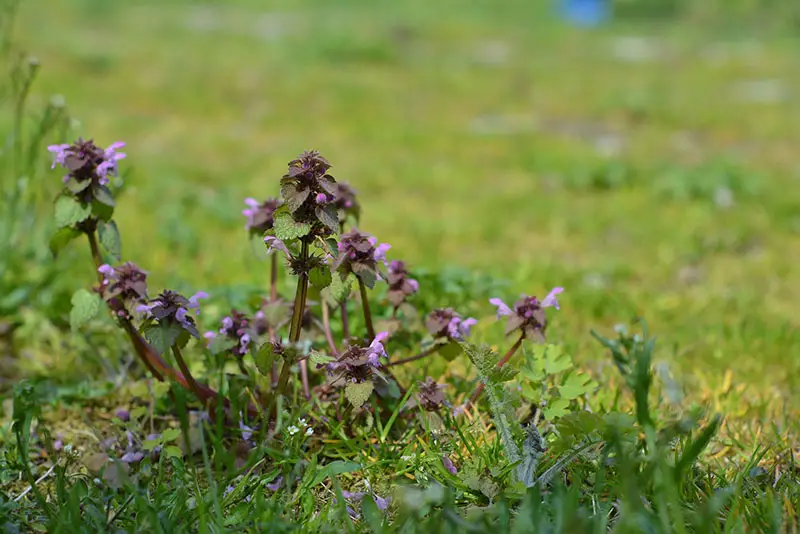
Henbit is often confused for another common weed, purple deadnettle. Purple deadnettle is also a weed that produces purple flowers that are almost identical to those of henbit. Despite this, you can differentiate henbit weeds vs deadnettle by looking at their leaves.
As we’ve mentioned, the leaves of henbit weeds are green, oval-shaped, and have scalloped edges. Purple deadnettle weeds, on the other hand, grow triangular-shaped leaves that have a distinctive reddish-purple color. Take a closer look at the leaves of the weeds on your lawn to determine whether you’re dealing with henbit or purple deadnettle.
Best Henbit Weed Killer
How to Kill Henbit Weed
To kill henbit weeds in your yard, you have two options. Firstly, the best natural way to kill henbit is to hand-pull the weeds. Alternatively, you can resort to chemical henbit weed killer if you’re dealing with a particularly severe or widespread infestation.
Hand-Pull Henbit
Your first option to get rid of henbit from your lawn is to hand-pull. This is the best method if you’re only dealing with a light infestation and it’s before the weeds have gone to seed. Although hand-pulling can be time-consuming, it’s better to try this method before resorting to a chemical method of henbit weed control.
Method:
- Give the soil around the affected areas a light watering to moisten the soil. This will make the removal process less laborious, and reduces the risk of the roots breaking off in the soil.
- Use a weeding hoe or garden trowel to dig around the henbit weeds’ roots. Loosen the root system from the surrounding soil.
- Grasp the henbit weed at its base before pulling up firmly. Remove all parts of the weed, including its entire root system from the soil. Continue pulling until you’ve removed all of the henbit from your lawn.
- Monitor the lawn for regrowth over the days after removal. You may need to carry out several hand-pulling sessions before you eradicate the last of the weed.
- To prevent reinfestations of henbit weeds, follow up the removal with the preventative methods we explain later in this article.
Kill Henbit with Weed Killer
Your second option to kill henbit weeds in a lawn is to treat them with a suitable post-emergent chemical herbicide. Again, this method will be most effective if you can carry it out in the spring while the weeds are still young.
Method:
- Purchase a post-emergent weed killer for henbit.
- Read the label of your chosen product carefully, taking note of its safety and application instructions. Make sure your herbicide is safe to use on your turfgrass.
- Wait for a day when the weather is calm and no rain is forecast for the following 48 hours. Strong winds will blow the herbicide into unwanted areas, while rainfall will carry it away from the treatment area.
- Put on protective clothing like gloves, safety goggles, and long sleeves and pants. The herbicide can be extremely harmful if it gets in your eyes or on your skin.
- Spray your herbicide onto the henbit weeds as per the application instructions for your product. Keep all children and pets off the lawn for as long as the product’s safety guidance recommends.
- Within about 2 weeks after herbicide application, the henbit weeds should start to brown and wilt. If necessary, make a repeat application after the length of time between applications recommended for your product.
- Once you’ve eliminated the henbit weeds, take some of the preventative measures we explain in the following sections to reduce the risk of reinfestation.
Note: It’s important to note that chemical treatments are toxic and can potentially harm children, pets, or other wildlife. If you don’t take care with application, the harsh chemicals in these treatments may damage your grass and plants; they may also contaminate nearby waterways and your local water supply. Only use chemical herbicides to kill henbit if the infestation is particularly severe.
How to Prevent Henbit Weed Infestations
You can prevent henbit weed infestations by maintaining a thick lawn, using corn-gluten meal or a layer of mulch, or treating the lawn with a pre-emergent herbicide.
Maintain Thick Lawn
Henbit is a hardy weed and will be able to grow well in a range of conditions. With that said, this weed seems to prefer areas in the lawn that are thin, shady, or overly moist. Therefore, to prevent infestations of henbit in a lawn, you should keep your grass healthy, green and thick.
As part of a full lawn maintenance routine, there are a few activities you need to keep up with. Watering, mowing, and fertilization are all crucial lawn care practices that you must carry out to maintain the health of your grass.
In general, lawns require about 1 to 1.5 inches of water per week, either through rainfall or irrigation. Add the necessary amount of water to your lawn in 1 to 2 deep watering sessions. The best time to water your lawn is in the early morning, between 6am and 10am.
You’ll need to mow your lawn to the best height for its species to keep it in optimal condition. When deciding how often to mow, you should base this on the grass’ height. Follow the ⅓ rule; this rule dictates that you should never remove ⅓ of the grass’ total height each mowing session. When your grass reaches 1.3x its ideal cutting height, you should mow the lawn.
In order to grow thick, strong grass, your lawn needs a range of nutrients in its soil, primarily nitrogen, phosphorus, and potassium. You can add these nutrients to your lawn through a proper fertilization routine. When and how often you fertilize your lawn will depend on your grass species; fertilize cool-season grasses in the spring and fall, and fertilize warm-season grasses in the late spring throughout the summer. Use the best lawn fertilizer ratio for your lawn’s individual needs; you can find out what nutrients your lawn needs most by testing your soil.
Mulch Soil
Weed suppression is one of the many benefits that a layer of mulch can bring to your lawn or garden. By mulching the soil, you can prevent henbit and other weeds from invading your lawn.
A layer of mulch works to prevent weeds as it creates a barrier between the soil and the sun. This barrier prevents sunlight from reaching weed seeds on the soil surface, preventing them from germinating or becoming established. It will also stifle young henbit weeds that do manage to germinate by starving them of sunlight.
In addition to preventing weeds, the mulch layer will also help with water retention and temperature maintenance in the soil. If you choose an organic material to make mulch, e.g. grass clippings or leaves, the mulch will act like a slow-release organic fertilizer too; it will provide your grass with a supply of nutrients as the organic matter decomposes over time.
Use Corn-Gluten Meal as Organic Pre-Emergent Herbicide
Corn gluten meal is a natural substance you can use as an organic pre-emergent herbicide for henbit weeds. This substance is a powdery by-product that comes from corn milling.
Corn-gluten meal will only be effective if you apply it before the henbit weed seeds germinate. It won’t prevent the seeds from germinating; instead, the corn-gluten meal will inhibit the root growth of newly germinated henbit seeds. Without sufficient roots, the young weed seedlings will die off.
As corn-gluten meal contains 10% nitrogen, it will behave like a slow-release fertilizer, in addition to providing weed control. The corn-gluten meal will release the nitrogen it contains into the soil as it decomposes over the months following application. This boost of nutrients will help further strengthen your grass against weed growth.
Take note that this method will inhibit the growth of any other seed you add to the treated area. I.e., the corn-gluten meal will also suppress the growth of grass seed you add after treatment.
Treat Soil with Chemical Pre-Emergent Herbicide
If your lawn is highly prone to henbit infestations, it may be best to opt for a chemical pre-emergent herbicide. These herbicides are specially formulated to kill weed seeds before they germinate.
To see results from pre-emergent herbicide, you’ll need to time the application well. To kill henbit weed seeds, apply the pre-emergent herbicide to your lawn or garden in the fall. Henbit weed seeds germinate in soil temperatures between 59 and 68°F; therefore, you’ll need to apply the treatment right before temperatures drop below 70°F. You can use a soil thermometer to determine when your soil reaches this temperature.