How to Locate Sprinkler Lines
The maintenance of your sprinkler system is necessary to ensure it works as efficiently as possible for as long as possible. Keeping the system running healthily is much more easily done when you are aware of where the system lies. This will make accessing the system easier and less invasive.
Locating sprinkler lines can be a laborious process if you don’t have access to a map. Thankfully, it’s a process that only needs to be done once if you remember to map out your findings. Trying to locate a lost valve, however, can be even more difficult, but can be remedied with techniques such as probing and valve chattering.
Sprinkler System Map
When your sprinkler system is installed, you should be given a map outlining the locations of the different valves and pipes that make up the system. If you haven’t made any changes to your system after being given this map then it’s just a matter of safely digging the lines up when needed. A map is usually created as a first step to designing a sprinkler system.
In order to check if your system map is correct, mark each of your sprinkler heads to see if they correspond to the ones on the map. If they do, then the chances are that the pipes also on the map will correspond. If you are to dig up your lines at any point, though, ensure that you give yourself an additional six inches on either side of where the pipe is laid just in case.
How to Make a Sprinkler System Map
If you don’t have a sprinkler system map, they’re easy to make yourself for future reference.
First, mark off your sprinkler heads, just as you would do if you were confirming whether a map was correct or not. Mark their pattern down on a piece of paper.
Next, mark your sprinkler lines. Sprinkler lines often run in the same direction and the first head is connected to the mainline.
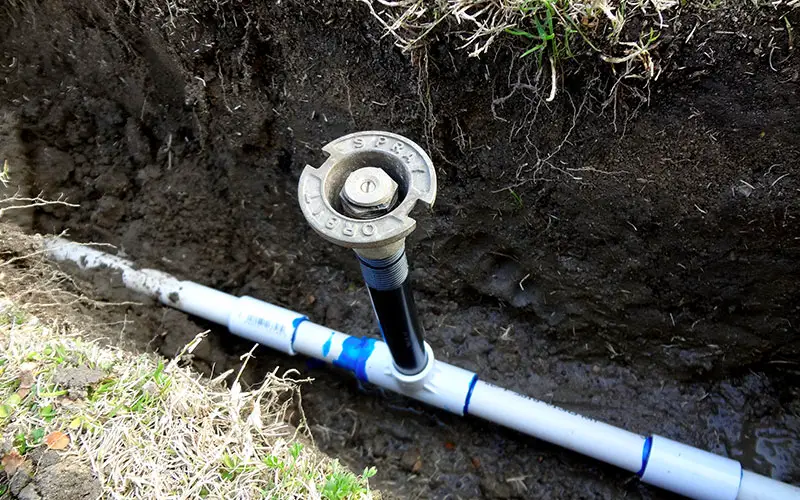
Unearthing some of the sprinkler lines requires a hand trowel and a steady hand. To find the location of your lines, begin to dig, carefully, around the base of the sprinkler heads. The lines can be anywhere from three inches to eight inches deep. Being gentle will ensure that your sprinkler heads are protected and that none are accidentally damaged during the process. By only digging the minimal amounts up, it should prevent you from needing to dig up the whole system. Mark off the direction of the lines on your map as you slowly dig them up. Eventually, a pattern will emerge outlining the shape of your sprinkler system.
How to Locate Buried Valves
Buried valves are harder to locate than sprinkler lines. This is because they can, in theory, be buried anywhere. The best thing to do first in order to find a buried valve is to consider where it’s most likely to be buried. If you know where other valves are located, it could give you a more general idea of where the missing one could be. For example, if all your valves are in the same area, the missing one may be nearby. Or if your valves are located near specific parts of the system which they control, the missing one will likely be somewhere close to where it controls.
Try Listening for it
It may seem pedantic and strange, but turning your system on and listening for the sounds of the water passing through a valve could potentially lead you to it quicker. Putting your ear to the ground, or using some sort of cup or tube for amplification can help you identify the location of your missing valve faster than going in completely blind.
Use a Metal Detector
Whilst not all valves are made of metal, most use some metal compounds, particularly as part of their solenoids. This method may not be the most reliable or effective, but it’s definitely worth trying if you have access to a metal detector. Following along the sprinkler lines with the metal detector will hopefully lead you to your missing valve.
Valve Chatterer
If a metal detector fails, a valve chatterer may come in handy. Valve chatterers will only work providing the valve has no damaged or broken wires leading to it, however. Valve chatterers work by rapidly flicking the valve on and off, producing a chattering sound. They work by disconnecting the system from the timer and hooking them up to the chatterer.
This works best when done at a quiet time of the day, as it relies on listening out for a faint sound of a valve chattering beneath the ground. Similarly to listening for it whilst the system is active, using some sort of apparatus to listen closer may be more helpful. If the valve is buried too deeply, it will make it less likely to be heard.
You can quite easily make a DIY chatterer as an alternative. Chatterers can be expensive, as they’re often used in a professional environment. Thankfully, there is a cheaper alternative, and they can be made fairly cheaply. They can be made simply with three 9 volt batteries. Place one atop of the other two, attaching it via the male and female snaps on the bottom two. The three batteries should snap together to form a block chain. From there, remove the splices from your valve wires and attach both of them to each of the open ends of the batteries. This should cause the valve to open. To help create the sound of the valve clicking on and off, remove one wire from the batteries and put it back repeatedly, causing it to chatter. This should be done at one-second intervals to keep the sound continuous and consistent.
Wire Tracer
A wire tracer, or wire locator, is a piece of professional equipment that is used to follow the path of the wires to the valves buried in your garden. Wire tracers are expensive, but can sometimes be rented out by hardware stores for personal use.
Wire tracers are useful as some are even able to hop the breaks in wires, meaning that it would be possible to find a disconnected valve with this method. The most effective wire tracers are ones that can detect signals from 25” of dirt depth. Whilst this may seem excessive as irrigation systems are rarely buried that deep, it will still be suitable for your needs. Most wire tracers are not strong enough to detect wires underground, so it’s important to use one that is specifically designed for this purpose.
To use a wire tracer, follow the line outwards from the location of the controller.
Probing
Probing for valves works best if they’re buried in a box, just below the surface. Probing requires a lot of patience, as it consists of prodding the ground with a pitchfork or other long instrument until you eventually find the valve box. Most valve boxes are buried just slightly below the surface, so aren’t too hard to find when poking through a thin layer of dirt.
This method is only one step up from the very last resort- which is digging.
Be warned that if your valve isn’t contained in a box, then probing or digging is likely to damage the wires leading to it.
Digging Up A Valve
Digging up a valve can be a risky business depending on whether it is in a box or not. It’s much easier and quicker to dig up a valve that’s contained in a box as opposed to one that isn’t, as it’s easier to damage the wiring if it isn’t contained. If your valve is contained in a box, then dig it up as you would usually. If not, then be sure to be careful with your shoveling. Use smaller instruments if possible, even things such as cups can help scoop dirt away in a safer manner than a trowel or shovel.
Once a valve that doesn’t have a box is dug up, make sure to box it up before putting it back. To rebury a valve in a box correctly, put a layer of gravel beneath underneath the box before lowering it into the dirt. This will prevent gophers or other rodents from digging into the box. Any type of box will do the job, providing it’s solid and will safely contain the valve along with its wires. Buying it at least three inches underground will also help make recovery easier the next time it needs to be dug up.
If you’ve just dug up a box with a valve in it, make sure to use a pole to open it from a distance in case any bugs or snakes have made their home inside.