Eliminate Stickers from Your Yard Easily
Nothing ruins a summer day like getting stuck with stickers from sticker weeds in your yard. Sticker weeds are a family of small irritating weeds which stick to skin, clothes, hair, and pets, causing pain and annoyance upon their removal. To enjoy your yard to its full extent, you’ll want to take some measures to get rid of sticker weeds when they appear.
Natural methods to get rid of stickers in a yard include manual removal, using white vinegar as a weed killer, and mulching the soil. For severe infestations, you can kill stickers using a chemical herbicide as a last resort. To prevent stickers from developing the following season, treat the lawn with a suitable pre-emergent herbicide.
What Are Sticker Weeds?
Stickers or sticker weeds are a type of summer weed that comes from burweed or sanbur; this is a grassy weed that grows laterally close to the ground in lawns and gardens. Burweed germinates in the early fall and survives throughout the winter before dying off in the spring. When the mature burweed dies off in spring, it releases seeds; these seeds are what become sticker weeds throughout the following summer months.
Types of Sticker Weeds
Sticker weeds come in a variety of subspecies, all part of the same weed family. Some of the most common types of sticker weeds include:
- Sandburrs/Sand Burrs: Sand burrs are small sticker weeds that typically grow in areas with sandy soil. They are covered in small spines that latch onto your skin and can be painful to remove.
- Grass Burrs: Grass burrs are sticker weeds typically found in grassy areas. They easily pierce skin using their long, sharp spines. These sticker weeds often stick to clothes and hair.
- Burweed Stickers/Sticker Burrs: Burweed stickers are commonly found on plants and bushes. They have stick-like bristles that are able to penetrate skin with ease.
- Lawn/Grass Stickers: Grass stickers grow along roadsides, in fields, and in other grassy areas. They are nicknamed “cat’s claws” due to their appearance; they are small and circular, having sharp points on all sides.
- Pricking Monsters: Pricking monsters are sticker weeds that look like small balls with spikes jutting out from their surface. When you touch them, the ball unfurls and the spikes on its surface penetrate your skin.
While there are some variations, all of the above types of sticker weeds are essentially the same thing.
How to Get Rid of Stickers in Yard
Natural methods to get rid of stickers in your yard include manual removal, dousing the stickers with vinegar, and mulching the soil. As a last resort, you can use a chemical herbicide to kill stickers in a lawn or garden.
Scalp the Lawn
If they’re growing among your grass, scalping the lawn is a straightforward method to get rid of stickers in your yard. You can either carry out this method alone or use it as a way to prepare for one of the other methods listed in this article.
1. Adjust Mower Deck Height
Adjust the deck height on your lawn mower so it’s at as short a level as your grass will tolerate. Make sure you know the best cutting height range for your grass type so you don’t take off too much of the leaf.
2. Mow Lawn with Bagging Attachment
With your mower set on a low height, mow the grass as normal. It’s essential to use a bagging attachment to collect the grass and sticker weeds as you mow; mowing without a bagging attachment will cause the weeds to spread to other parts of your lawn.
3. Continue with this Method or Use an Alternative Method of Removal
To get rid of stickers by scalping the lawn alone, repeat the previous step at least 2 more times in the same week. Alternatively, you can opt to use one of the other methods listed in this article to get rid of the sticker weeds after scalping.
Manually Pull Up the Sticker Weeds
If your lawn or garden only has a few sticker weed plants, you can attempt to remove them by hand.
1. Put on Protective Clothing
Before handling the weeds, you need to put on protective clothing like gloves to protect your skin. The spines of the stickers will latch onto your hands and any other exposed area on your body. In addition to thick gardening gloves, wear long pants and a long-sleeved shirt.
2. Manually Remove Stickers
Grasp the sticker weed at the base of the plant before pulling up firmly. Try to remove as much of the plant and its roots as possible from the soil.
3. Follow Up with an Application of Herbicide
For this method to be most effective, it’s best to follow up the removal with an application of herbicide. Treat the lawn with an appropriate weed killer for sticker weeds to eliminate the last of the growth.
Use White Vinegar as Weed Killer
Vinegar is one of the best ingredients you can use as a natural weed killer to get rid of sticker weeds. The acidic elements that white vinegar contains will kill stickers naturally, making it a great organic alternative to chemical herbicides.
1. Mow Lawn Closely
If you’re treating a lawn, you should first mow the grass as close as possible for its species. The vinegar that will be the primary ingredient of your homemade weed killer can also damage lawn grass; keep this in mind when applying it to your lawn. If you’re treating any other part of your yard, you can disregard this step – just avoid spraying the vinegar solution on any plants you don’t wish to harm.
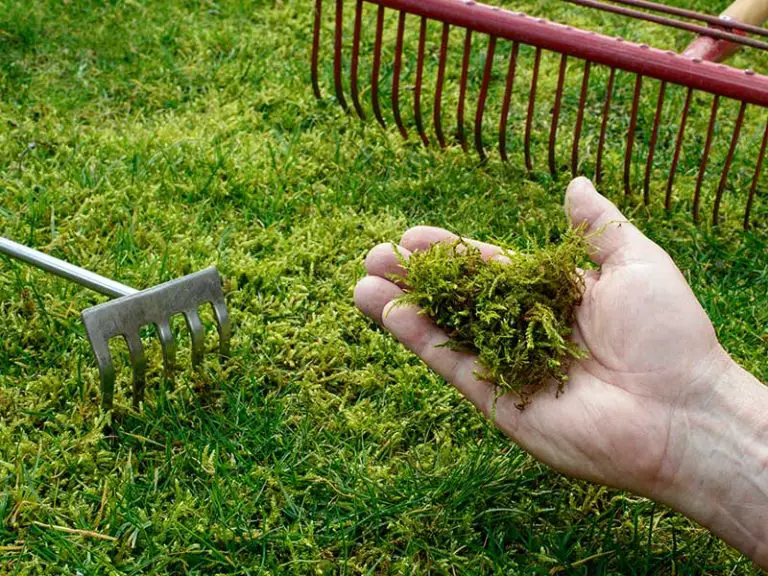
2. Rake Excess Stickers
Begin by raking the lawn to gather as much of the sticker weeds as possible. This is to reduce the amount of the sticker weeds you need to tackle with the vinegar weed killer. Dispose of the stickers using a trash bag; avoid placing them on your compost pile, as this may reintroduce the weed to your yard when you later use the compost.
3. Spray Stickers with Vinegar
To make your vinegar weed killer, purchase a white vinegar spray bottle, or place white vinegar into a clean spray bottle. Begin spraying the vinegar over the parts of your lawn affected by the stickers. It’s important to douse the weeds with the vinegar rather than spraying them lightly.
4. Repeat Treatment Daily
For this method to take full effect, you may need to repeat applications of the vinegar daily for several days. Don’t stop this daily routine until all of the sticker weeds are dead. Once you kill off the last of the stickers, collect up the dead plant material and dispose of it in a trash bag.
5. Repair Damage on Lawn By Overseeding
If you used this method on a lawn, there’s a high chance you’ll be left with patches of bare soil where the vinegar damaged the grass. You can fix these patches by overseeding the lawn with your grass type.
Mulch the Soil
One of the many benefits of mulching a lawn or garden is that it can suppress and prevent weed growth in the soil. You can therefore use a layer of mulch to get rid of stickers in your yard and prevent them from returning. The mulch layer will also help the soil to retain moisture while providing your grass or plants with nutrients as it decomposes.
1. Mow Lawn Closely
If treating a lawn, mow the grass to the lowest recommended height for its species. This will help to remove as much of the sticker weeds as possible before adding your mulch layer.
2. Choose a Suitable Mulching Material
Choose a suitable material to use as your mulch layer in your lawn or garden. The best materials to use for this DIY mulch are leaves, straw, or bark chips; these organic materials will gradually break down over time, acting as a slow-release fertilizer for your wanted growth. If using leaves, make sure that the leaves are finely chopped to prevent clumping.
3. Add Layer of Mulch to Lawn or Garden
Spread your chosen mulching material across the soil in a layer of 2 to 4 inches thick. Make sure the layer is evenly distributed across the entirety of the soil surface. This layer will block sunlight from reaching the low-growing sticker weeds, causing them to die off. It will also prevent any new weed seeds on the soil surface from germinating and becoming established plants.
4. Replenish Mulch Every Few Weeks
For this method to be fully effective, you may need to replace the mulch every few weeks to maintain the barrier.
Treat Lawn With Herbicide
For severe or extensive infestations of sticker weeds, you can use a chemical herbicide as a last resort. These products are only recommended after you have tried all other methods of removal; chemical treatments are worse for the environment and can be dangerous to wildlife, pets, and children.
1. Choose an Appropriate Herbicide
Choose an appropriate post-emergent herbicide to get rid of stickers. The most common type of herbicide to kill stickers is MSMA; the primary ingredient in this weed killer is arsenic, a poisonous metal that will kill sticker weeds on contact. Take note that this type of herbicide is restricted in some places; you may need to contact a professional to apply MSMA according to the laws in your area.
2. Apply Herbicide During Spring to Summer
You should apply the herbicide at some point throughout the spring and summer, between the months of May and July. Herbicides like MSMA will be most effective when applied to the sticker weeds during their period of most active growth.
3. Treat Lawn or Garden with Herbicide
Before treating the lawn or garden, read the safety and application instructions for your product carefully. Put on full protective gear, including gloves and safety goggles. Apply the herbicide to your lawn or garden according to the instructions for your chosen product. Ensure any children or pets in your household stay away from the area for at least 1 to 2 days.
4. Follow Up Treatment with Fertilizer
After the herbicide has taken full effect to eliminate the stickers, amend the soil with an application of fertilizer. This will nourish your grass or plants and encourage them to recover after the treatment.
How to Prevent Sticker Weeds
To prevent sticker weeds returning the next season, you can treat your lawn or garden with a pre-emergent herbicide. For lawns, the best way to prevent these weeds is to keep your grass well-maintained through mowing and fertilization.
Treat Soil with Pre-Emergent Herbicide
Pre-emergent herbicides are specially designed to kill weed seeds before they get a chance to establish themselves in the soil. You can prevent sticker weeds from growing in your yard by applying this herbicide at the right time. Take note that this formulation will not kill any mature sticker weeds; it will only work to prevent new weeds before the seeds germinate.
1. Purchase a Suitable Pre-emergent Herbicide
Purchase a pre-emergent herbicide labeled to prevent sticker weeds. The most common ingredient found in these herbicides is pendimethalin.
2. Wait for Suitable Conditions to Apply Herbicide
Pre-emergent herbicides are only effective if you apply them at the right time. For sticker weeds, you’ll need to apply pre-emergent herbicide at some point in February or March, or when soil temperatures reach 55°F. You can use a soil thermometer to determine when the soil reaches this temperature in the early spring.
3. Apply Herbicide to Lawn or Garden
Read the application and safety instructions for your particular product before using it. Apply the herbicide as per the instructions, ensuring an even distribution of the product across the soil. Take note that pre-emergent weed killer may also kill new seed you add to the soil after the treatment; if you plan to seed the area, make sure you leave enough time between the herbicide application and the seeding.
Fertilize Lawn
Maintaining a thick lawn is one of the best ways to naturally choke out weed growth, including the growth of sticker weeds. A crucial element of lawn maintenance is fertilization. Your lawn requires a range of nutrients, primarily nitrogen, phosphorus, and potassium, in order to grow properly. You can provide this nutrition for your grass plants through a high-quality fertilizer.
1. Choose the Best Fertilizer For Your Lawn
All lawns have different nutritional requirements, which is why fertilizers come with different balances of nutrients. You can find out the amount of nitrogen (N), phosphorus (P), and potassium (K) that a fertilizer contains by the NPK ratio listed on its packaging.
To determine which is the best fertilizer for your lawn, you should test your soil; a soil test will reveal its current nutrient content and which nutrients it lacks. You can then judge what the best lawn fertilizer ratio would be for your grass’ individual requirements.
2. Fertilize at the Right Times for Your Grass
The best time to fertilize your lawn will depend on your grass type and the climate of your area. Cool-season grass will benefit from 2 to 4 fertilizations in spring and fall. Warm-season grass should be fertilized every 4 to 8 weeks from the spring throughout summer. These are the periods of most active growth for each grass type, i.e. when your grass will benefit from the nutrients the most.
3. Apply the Fertilizer
Fertilize your lawn using an appropriate spreader; you can use either a drop spreader or broadcast spreader depending on the size of the area. Set your spreader according to the recommendations on the packaging of your chosen product. If you use a granular formula, it may be necessary to water in the product after application.
Mow Regularly
You can get rid of sticker weeds and keep them out by mowing your lawn regularly.
Keep up with your regular mowing schedule, especially during your grass’ active growth period. Remember to bag your grass clippings as you mow to avoid spreading the stickers around your yard.